Water Dripping From Roof Outside: 6 Common Causes and Quick Fixes

Water dripping from roof outside can be more than just an annoying sound – it's often a warning sign that shouldn't be ignored. We've all experienced that persistent drip during or after rainfall but determining whether it's normal runoff or a serious problem requires closer inspection.
Understanding why water drips from your roof helps prevent costly damage to your home's structure and foundation. While some dripping is expected during heavy rain the location timing and frequency can reveal underlying issues that need immediate attention.
We'll explore the common causes behind roof dripping from simple explanations like clogged gutters to more complex problems involving damaged shingles or improper drainage. By learning to identify these signs you'll know when it's time to take action and protect your home from water damage.
Common Causes of Water Dripping From Roof Outside
We identify four primary factors that create water dripping from roof exteriors. Each cause requires specific inspection methods and repair approaches to prevent structural damage.
Damaged or Missing Shingles
Shingles protect your roof's underlayment from water penetration. Damaged shingles (cracked, curled, or torn pieces) allow water to seep beneath the surface layer. Missing shingles create direct pathways for water entry during rain events.
Wind speeds exceeding 60 mph commonly lift shingle edges. Hail impacts larger than 1 inch in diameter create punctures and cracks. Age deterioration occurs after 15-20 years for asphalt shingles and causes granule loss.
We check for these damage indicators:
- Dark spots on shingles indicating moisture retention
- Exposed nail heads from lifted shingles
- Granules accumulating in gutters
- Visible gaps between shingle rows
Water enters through damaged areas and travels along roof decking. The dripping appears at the roof edge when water reaches the fascia board. Temperature changes cause expansion and contraction that worsen existing shingle damage.
Clogged or Damaged Gutters
Gutters channel 1,200 gallons of water per inch of rainfall from a 1,000-square-foot roof. Clogs prevent proper water flow and force overflow at the roof edge. Debris accumulation (leaves, twigs, pine needles) blocks downspouts and creates standing water.
Gutter damage manifests in several forms:
- Separated seams leaking at 2-3 foot intervals
- Rust holes measuring 1/4 inch or larger
- Sagging sections dropping below the roofline
- Disconnected downspouts at elbow joints
We inspect gutters twice yearly during spring and fall seasons. Water overflowing from clogged gutters saturates fascia boards and soffits. Ice formation in winter months adds 5.7 pounds per cubic foot of weight to damaged gutter systems.
Improper gutter slope prevents drainage efficiency. Gutters require 1/4 inch decline per 10 feet of length for optimal flow. Brackets spaced more than 36 inches apart cause sagging and pooling.
Ice Dams and Snow Buildup
Ice dams form when attic temperatures exceed 32°F while exterior temperatures remain below freezing. Snow melts on warm roof sections and refreezes at cold eaves. The ice barrier grows 2-3 inches per freeze cycle.
Snow accumulation exceeding 6 inches creates conditions for ice dam formation. Heat loss through inadequate attic insulation (R-values below 38) accelerates melting. Poor ventilation traps warm air against roof decking.
ce dam characteristics include:
- Icicles longer than 3 feet hanging from gutters
- Water stains on interior ceilings near exterior walls
- Ice ridges visible along roof edges
- Shingle lifting from repeated freeze-thaw cycles
We calculate that a 1-inch ice dam holds back 6 inches of water. This trapped water penetrates shingles and drips through soffits. Proper attic ventilation requires 1 square foot of vent area per 150 square feet of attic space.
Faulty Flashing Around Roof Features
Flashing seals roof penetrations (chimneys, vents, skylights) against water intrusion. Metal flashing deteriorates after 20 years through oxidation and thermal movement. Rubber boot flashings crack after 10-15 years of UV exposure.
Common flashing failure points include:
- Chimney step flashing with 1/8-inch gaps
- Vent pipe boots with visible cracks
- Valley flashing with rust penetration
- Skylight flashing with separated caulk joints
We examine flashing during dry conditions to identify potential leak sources. Caulk shrinkage creates openings as small as 1/16 inch that admit water. Wind-driven rain enters these gaps and exits at roof edges.
Improper flashing installation causes immediate problems. Flashing requires 4-inch minimum overlap at joints. Missing kickout flashing diverts water behind siding materials. Counter flashing extends 2 inches minimum into masonry joints for effective sealing.
How to Identify the Source of Roof Drips

Identifying the exact source of roof drips requires systematic inspection techniques and awareness of key indicators. We'll explore proven methods to locate water entry points before they cause extensive damage to your home's structure.
Visual Inspection Methods
We start roof leak detection by examining shingles for damage, missing pieces, cracks, curls, or buckling. These defects create pathways for water penetration during rainfall. Damaged shingles appear darker than surrounding materials and may show granule loss.
We inspect flashing next—the metal strips sealing roof joints around chimneys, vents, and valleys. Rust spots, bent sections, or gaps in flashing account for 85% of roof leaks according to roofing professionals. Flashing failures occur most frequently where different roof planes meet.
We check the attic during daylight hours to spot water stains on rafters and sheathing. Dark patches on wood surfaces indicate active or past leaks. Light penetrating through the roof deck reveals holes requiring immediate repair.
We use moisture meters to detect dampness levels in suspected areas. Readings above 20% moisture content signal water intrusion. Infrared cameras identify temperature variations that pinpoint hidden leaks without removing roofing materials.
Signs of Water Damage to Look For
We recognize water damage through several distinct indicators on roofing materials and interior surfaces. Brown or yellow stains on ceilings mark the most obvious signs of roof leaks. These stains expand outward from the water entry point.
We look for sagging sections in the roof deck visible from inside the attic. Prolonged moisture exposure weakens wood structures, creating visible dips. Sagging areas require immediate professional assessment to prevent collapse.
We identify mold growth appearing as black, green, or white patches on wood surfaces. Mold develops within 24-48 hours of water exposure in warm conditions. Musty odors in attic spaces confirm moisture problems even without visible mold.
We examine exterior walls for water streaks beneath eaves and soffits. Paint peeling, bubbling, or discoloration on interior walls indicates water traveling through roof structures. Pooled water on flat roof sections signals drainage failures requiring prompt attention.
When to Check During Different Weather Conditions
We perform roof inspections immediately after heavy rainstorms to catch active leaks. Water dripping during or within 24 hours of rainfall pinpoints current leak locations. Mark these spots with chalk for dry-weather repairs.
We check roofs in late winter when ice dams form along edges. Ice dams develop when attic heat melts snow, which refreezes at colder eaves. This ice barrier forces water under shingles, creating leaks 2-3 feet from the roof edge.
We conduct controlled water tests during dry periods using garden hoses. Starting at the lowest roof point, we spray water in sections for 5-10 minutes each. A helper inside the attic identifies where water enters, narrowing the search area.
We schedule professional infrared scans during temperature transitions—early morning or late afternoon. Temperature differences between wet and dry materials create clear thermal patterns. These scans detect moisture trapped in insulation or decking that visual inspections miss.
DIY Solutions for Minor Roof Dripping Issues
Minor roof dripping requires immediate attention to prevent structural damage and costly repairs. We can address these issues temporarily using accessible materials and proper techniques while planning permanent solutions.
Temporary Fixes and Emergency Repairs
Waterproof tarps provide immediate protection against roof drips. We secure 6-mil polyethylene tarps over damaged areas using cap nails spaced 12 inches apart along the edges. The tarp extends 4 feet beyond the leak point on all sides for complete coverage.
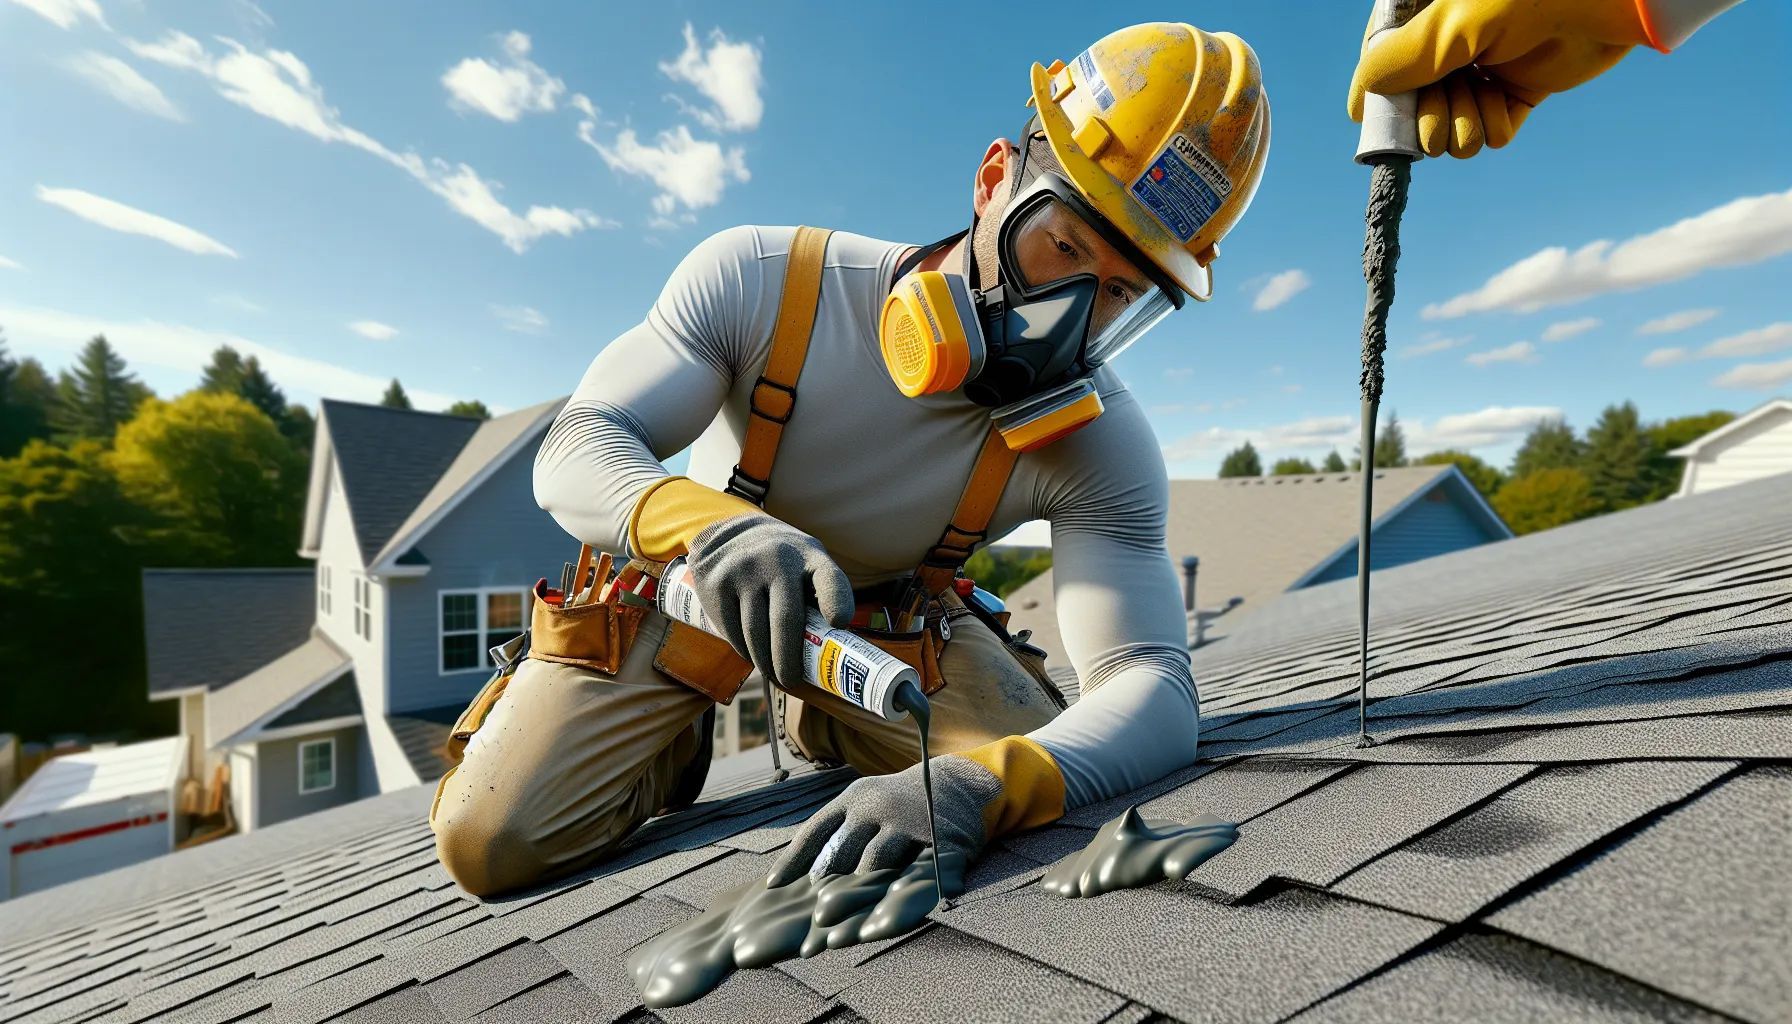
Roofing cement offers quick sealing for small holes. We apply a 1/4-inch thick layer around cracks using a putty knife. The cement bonds within 24 hours and withstands temperatures from -20°F to 180°F.
Waterproof tape seals gaps measuring less than 2 inches wide. We clean the surface first and apply butyl rubber tape in overlapping strips. Each strip overlaps the previous one by 2 inches for maximum protection.
Polyethylene plastic sheets work for larger damaged areas. We cut sheets 8 feet larger than the hole and secure them with sandbags weighing 20-30 pounds each. The plastic redirects water away from the damaged section.
Gutter Cleaning and Maintenance
Clogged gutters cause 35% of roof edge dripping. We remove debris from gutters twice yearly in spring and fall. Leaves, twigs, and sediment block water flow and create overflow conditions.
Proper gutter slope ensures efficient drainage. We maintain a 1/4-inch decline for every 10 feet of gutter length. This slope moves water toward downspouts at 2 gallons per minute during moderate rainfall.
Tree branches create gutter blockages and roof damage. We trim branches 10 feet away from the roof edge. Oak, maple, and pine trees drop the most debris into gutter systems.
Gutter guards reduce cleaning frequency by 75%. We install mesh screens or foam inserts that allow water through while blocking leaves. These guards require inspection every 6 months for optimal performance.
Sealing Small Cracks and Gaps
EPDM rubber roofs develop small cracks after 10-15 years of exposure. We repair these using liquid rubber sealant applied in three layers. The first layer penetrates the crack, the second embeds polyester fleece, and the third creates a waterproof barrier.
Skylight perimeters account for 20% of minor roof leaks. We apply silicone sealant around the entire frame using a caulk gun. The bead measures 1/4-inch wide and fills gaps between the skylight and roofing material.
Vent pipe boots crack from UV exposure. We slide rubber boot repairs over existing boots without removing shingles. These repairs last 5-7 years and cost $15-25 per boot.
Flashing gaps allow water penetration at roof joints. We seal gaps under 1/8-inch with polyurethane caulk rated for exterior use. The caulk remains flexible through temperature changes from 0°F to 120°F.
When to Call a Professional Roofer

Water dripping from your roof outside requires immediate evaluation to prevent structural damage. We recommend contacting professional roofers when specific conditions arise that exceed basic maintenance capabilities.
Warning Signs of Serious Damage
Professional roofers identify critical damage indicators through systematic inspection methods. Water stains appearing on ceilings indicate active leaks requiring immediate attention. Missing shingles create exposed areas where water penetrates roofing underlayment within 24-48 hours of rain exposure.
Sagging roof sections signal compromised structural integrity affecting rafters and decking. Professional inspections reveal 85% of sagging cases involve rotted wood requiring replacement. Granule accumulation in gutters exceeding 2 cups per 10-foot section indicates advanced shingle deterioration.
Daylight visible through roof boards demands emergency repair services. Water pooling on flat roof sections longer than 48 hours causes membrane breakdown. Multiple leak locations appearing simultaneously suggest systemic failure requiring comprehensive assessment.
Fascia board discoloration extending beyond 6 inches from the roofline indicates chronic water exposure. Professional thermal imaging detects moisture penetration patterns invisible during visual inspections. Mold growth covering areas larger than 10 square feet requires specialized remediation equipment.
Preventing Future Water Dripping Problems
We prevent water dripping problems through consistent maintenance and proactive measures. Our approach combines regular inspections with seasonal preparations and permanent waterproofing solutions.
Regular Roof Maintenance Schedule
We recommend following a quarterly maintenance schedule to protect your roof throughout the year. Spring maintenance starts with gutter cleaning and inspection for winter damage. We check each shingle for cracks or lifting edges during this inspection. Clearing debris from valleys and checking downspout connections prevents water backup.
Summer inspections focus on structural integrity. We examine the roof deck for sagging areas that indicate water damage. Checking attic ventilation ensures proper airflow reduces moisture buildup. We inspect sealants around penetrations like vents and pipes for deterioration.
Fall preparation involves another thorough gutter cleaning before leaves accumulate. We secure loose shingles and inspect for animal damage from squirrels or birds. Trimming overhanging branches prevents debris accumulation and physical damage during storms.
Winter monitoring requires checking for ice dam formation after snowfall. We ensure insulation maintains consistent attic temperatures below 32°F. Removing excess snow prevents structural stress and water infiltration when melting occurs.
Long-Term Waterproofing Solutions
We carry out permanent waterproofing systems that last 20-30 years with proper maintenance. Waterproof underlayment installation creates a secondary defense layer beneath shingles. We use synthetic materials that resist tearing and provide superior water resistance compared to traditional felt paper.
Commercial-grade coatings extend roof life and enhance water resistance. We apply elastomeric coatings that expand and contract with temperature changes. These coatings seal minor cracks and reflect UV rays reducing thermal stress.
Vegetative roof systems manage stormwater naturally on flat or low-slope roofs. We install drainage layers beneath soil media that direct excess water to drains. Plants absorb rainfall reducing runoff volume by 50-90% during storm events.
Professional waterproofing membranes offer maximum protection for problem areas. We install rubberized asphalt or modified bitumen systems around critical junctions. These materials self-seal around fasteners preventing water migration through penetrations.
Conclusion
Water dripping from your roof exterior shouldn't be ignored. We've explored how these drips can signal everything from minor maintenance needs to serious structural concerns that require immediate attention.
Regular roof inspections and prompt repairs will save you thousands in potential water damage costs. Whether it's clearing gutters seasonally or addressing damaged shingles quickly we can't stress enough how prevention beats restoration every time.
Your home's protection starts at the top. By staying vigilant about roof maintenance and addressing drips when they first appear you'll ensure your roof continues doing its job effectively for years to come.
Remember that while many minor issues can be handled yourself knowing when to call professionals is equally important. When in doubt reach out to qualified roofing contractors who can provide expert assessments and lasting solutions for your specific situation.
What causes water to drip from my roof?
Water dripping from roofs typically results from four main issues: damaged or missing shingles, clogged gutters, ice dams from poor attic insulation, and faulty flashing around roof features. Each cause requires different inspection methods and repairs. Regular maintenance can prevent most dripping problems before they cause structural damage.
How can I tell if roof dripping is serious?
Serious warning signs include brown or yellow ceiling stains, visible sagging in roof sections, mold growth, and water streaks on exterior walls. If you see multiple missing shingles, daylight through roof boards, or extensive water damage inside your home, immediate professional attention is needed.
Can I fix roof dripping myself?
Minor issues like small leaks can be temporarily fixed using waterproof tarps, roofing cement, or waterproof tape. Regular gutter cleaning and sealing small cracks are manageable DIY tasks. However, extensive damage, structural issues, or work requiring roof access should be handled by professionals for safety and proper repair.
How often should I inspect my roof for potential dripping issues?
Perform visual inspections quarterly, with thorough checks after heavy storms and during late winter for ice dams. Clean gutters twice yearly in spring and fall. Schedule professional inspections annually or after severe weather events to catch problems early and prevent costly water damage.
When should I call a professional roofer?
Contact a professional immediately when you notice ceiling water stains, multiple missing shingles, sagging roof sections, or daylight visible through roof boards. Also seek help for extensive ice dams, major flashing repairs, or any situation requiring significant roof work for safety reasons.